


Approximately 10 minutes to complete.
Congratulations on your new espresso Display. We're excited to see where you use it and how it improves your workflow.
Our products are designed to make how you work easier, and this page is designed to shorten the learning curve as much as possible.
How to utilise this onboarding procedure
These instructions are designed to be thorough for when you get stuck at a particular step. If you are very familiar with tech, feel free to move through this information or set yourself up and reference this if you are looking for something.
There is a form at the bottom of this page if you need help. This is a priority support line as we want you to get setup right away.
4 steps to get setup

Please give each step a try before contacting support, and if you do contact us, please let us know the following information:
- What device you are connecting your Display to (specific model is most helpful as we can look it up online)
- What step you got up to
- Specific information about where you got stuck (the more you tell us, the more we can help!)
This walkthrough focuses on each step. If you get stuck at one of the steps, please contact us. Now let's get started!
Part 1: Setting up the stand accessories
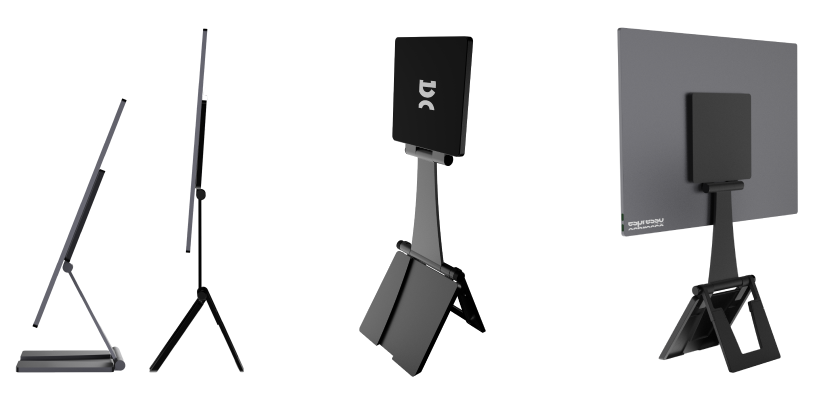
1. espresso Stand, Stand+ & Stand Pro
The espresso Stand is great for adjusting your perfect viewing angle. It has a dual-hinge so you can adjust the height and angle of the Display, which can also pack away flat for transit.
You will get the feel for how to adjust it to suit your preferences, this walkthrough goes through the two main things to know:
Step 1.1. The corresponding magnetic area on the espresso Display are in the middle centre of the Display. Please practice lining it up correctly, the Display will slip off if it is placed too low, high or to either side
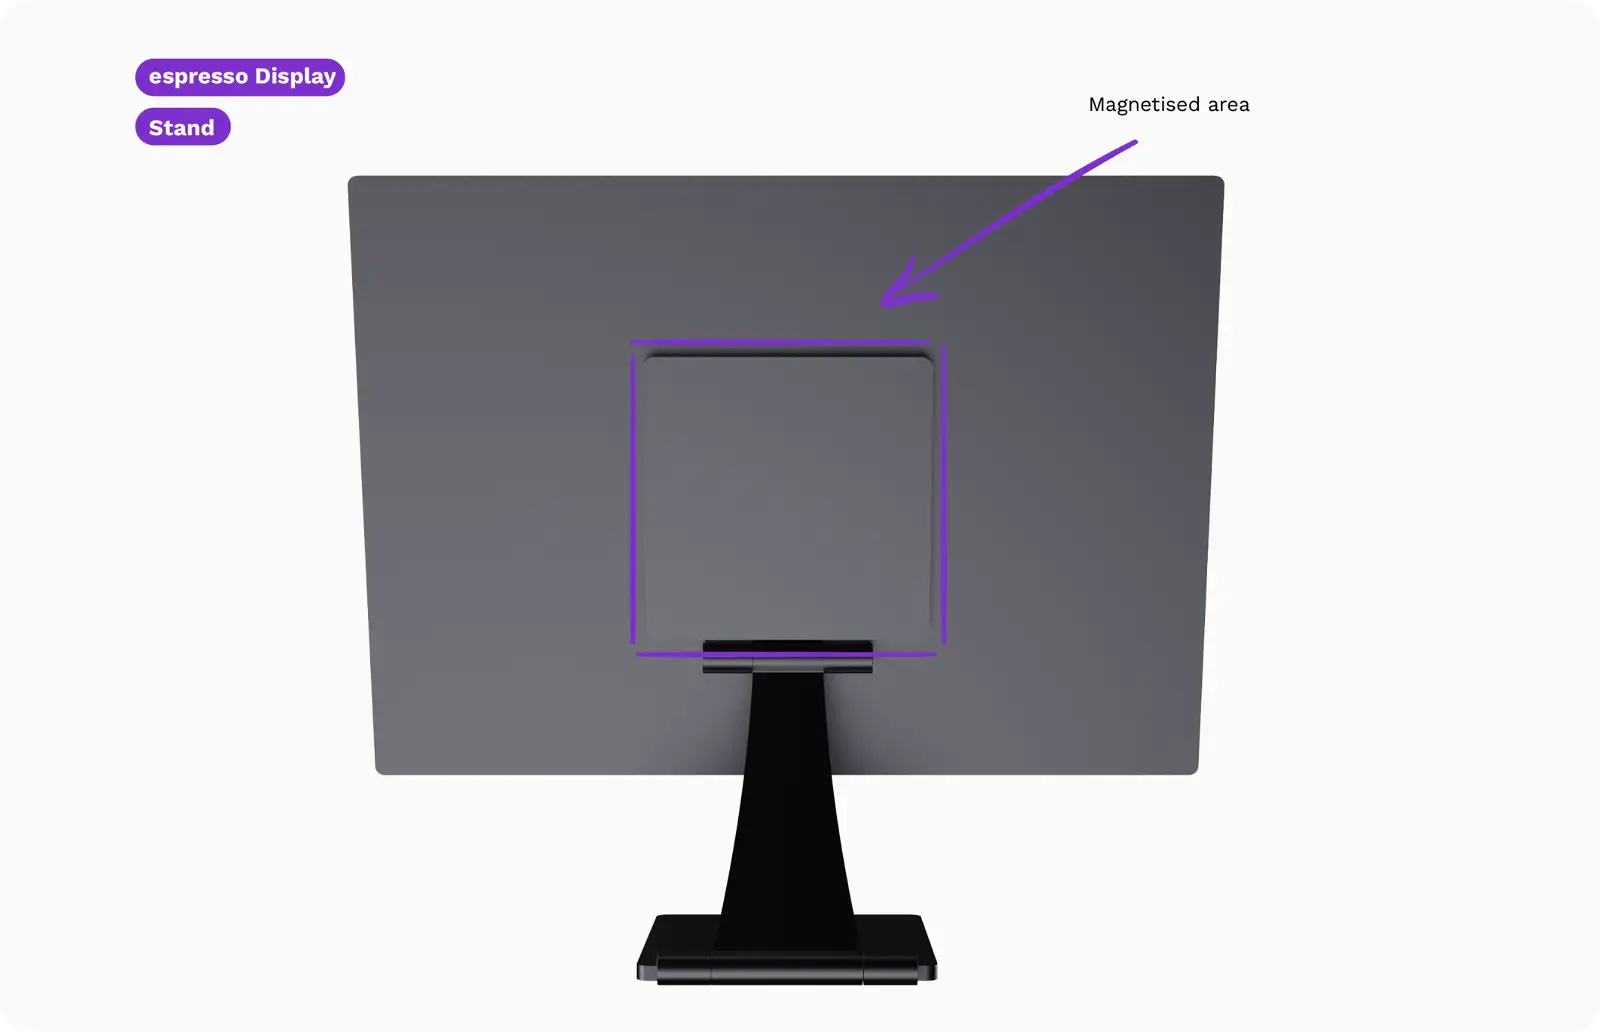
Step 1.2. Don't lean the stand too far forward or back, as it will imbalance the stand with the weight of the Display and fall forward. The image below show how to balance the stand appropriately
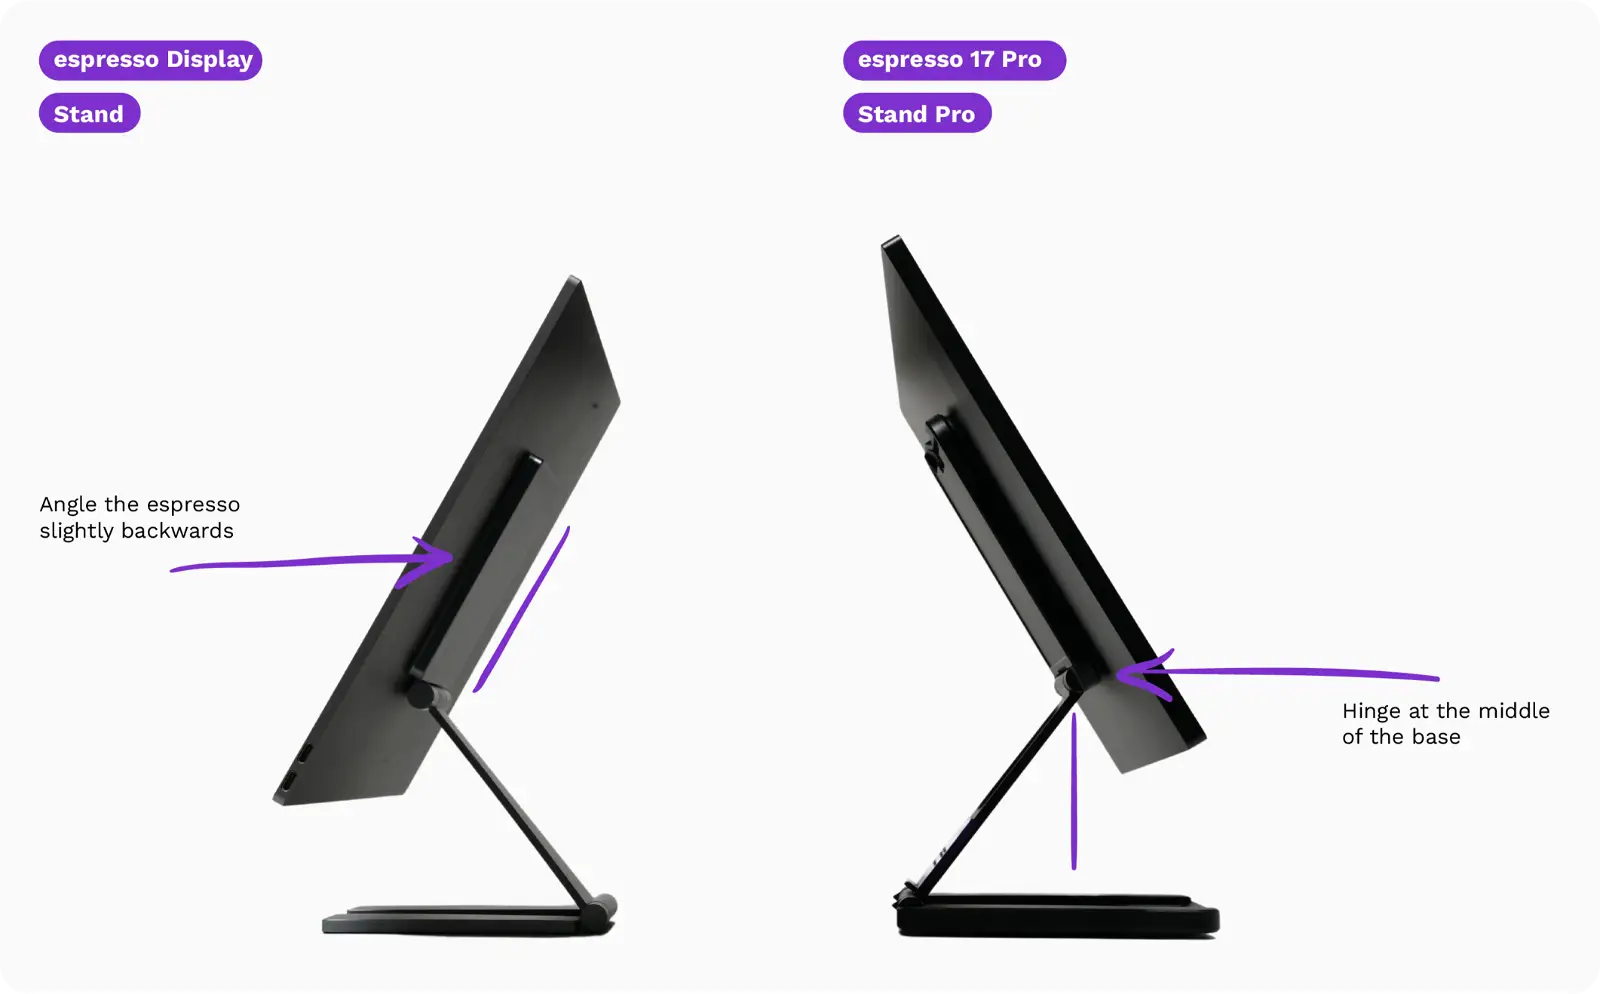
Step 1.3. For Stand+ users taking advantage of the elevated stand setup. We recommend positioning the magnetic plate straight up from the centre of your Stand+.
This will provide the most support for your espresso, and dramatically reduce the risk of your display falling over while using Stand+. The image below shows the most secure position to use with Stand+.
Part 2: Connecting your Display to your Device
Step 2.1. Please start connecting your espresso to a laptop or desktop computer, before attempting to connect to other devices such as phones, tablets or gaming consoles.
This helps you understand how the espresso Display works before adapting to nuances of these devices, which are smaller and usually require additional power.
Step 2.2. Your laptop should have one or multiple USB-C ports on it. Using the provided cable from the espresso packaging, connect one side to either port of the espresso Display, and the other to your laptop.
Note⚠️: Please do not use other USB-C cables, many of them are power only and will not show the video image of your screen to the espresso display.
Once you connect the espresso Display, two things should happen:
- The espresso logo should flash on. This shows that the Display is receiving power from your laptop
- After 2-3 seconds, a video image should show up. This may mirror your laptop or show an extended screen.
If this is not working for you, there are three likely reasons:
- You are not using the espresso cable. Please double check, as this is a common mistake
- Your device may have a USB-C port that doesn't send the video signal (less common, but mostly for devices that were released around 2018 and some Microsoft devices which connect to external monitors via the Microsoft Dock)
- The espresso Display or cable may be faulty (this is extremely rare)
You may need our HDMI or Mini-DisplayPort cable. If you know that you need this, you can check out the options on the above links, or if you are unsure and want to double check, please contact us using the form at the bottom of the page.
Otherwise you should have your Display connected to your device!
If you have any issues or questions about this step, please get in touch with our support team at the bottom of the page.
Part 3: Adjusting the settings to suit your preferences
Step 3.1. To adjust brightness, volume, contrast and colour settings, you can do this from a swipe-up gesture on your espresso.
Start from the very bottom of the espresso, and with two fingers do a swipe-up motion and stop at about 10cm. You don’t need to swipe very far to trigger the on screen menu.
Steps 3.2. You should now see a menu on your espresso, where you can adjust your settings to suit your preferences. Tap outside of this menu to close it.
This part of the tutorial is where we start to do different instructions based on Windows or Mac. If you are on a Windows device, please scroll down to 3b. Adjust settings for Windows
3a. Adjusting settings for macOS
Native Settings
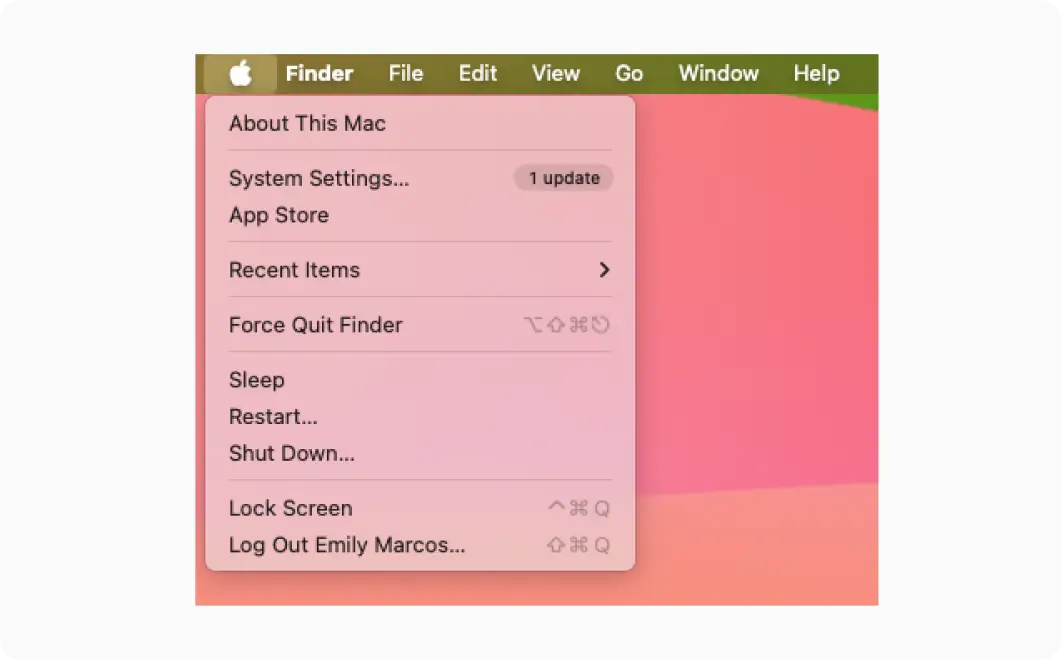
Step 3a.1. To adjust your display settings using native settings first click on the Apple icon on the top left corner of your screen.
Step 3a.2. Click on System Settings.
Step 3a.3. Click on Displays
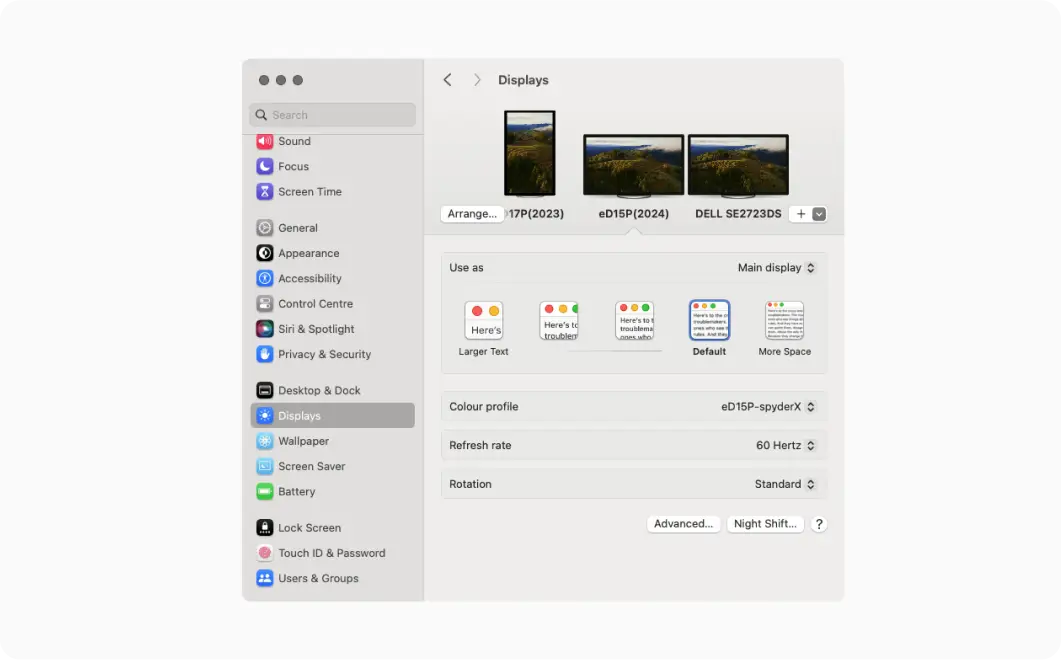
Step 3a.4. Click "Arrange" to change the placement of the Display to correspond to your real-world placement for smooth mouse navigation between screens.
Step 3a.5. Click the secondary monitor to adjust the resolution, colour profile, and rotation.
Step 3a.6. Click the "Use As" drop down to switch between mirroring your Display, using it as an extend screen and adjusting which screen you want to be the main screen (where the menu bar is placed).
We have built a lot of functionality outside what a typical mac device can do. This is enabled through our free software downloadable from our website called espressoFlow. We have also included a lot of settings in this, to make a control centre for your espresso Display.
espressoFlow is also the driver which enables Auto-Rotation and the touchscreen, so if you're looking to use both of those, please download espressoFlow.
About espressoFlow
This software requires macOS Ventura or later. Ventura was released in October 2022, so if you haven't updated your software in 1.5 years, please do so now to utilise espressoFlow. You're probably missing a bunch of awesome new Mac features as well!
- Click here to download for Apple Silicon (M1, M2, M3)
- Click here to download for Intel Mac (2019 and earlier)
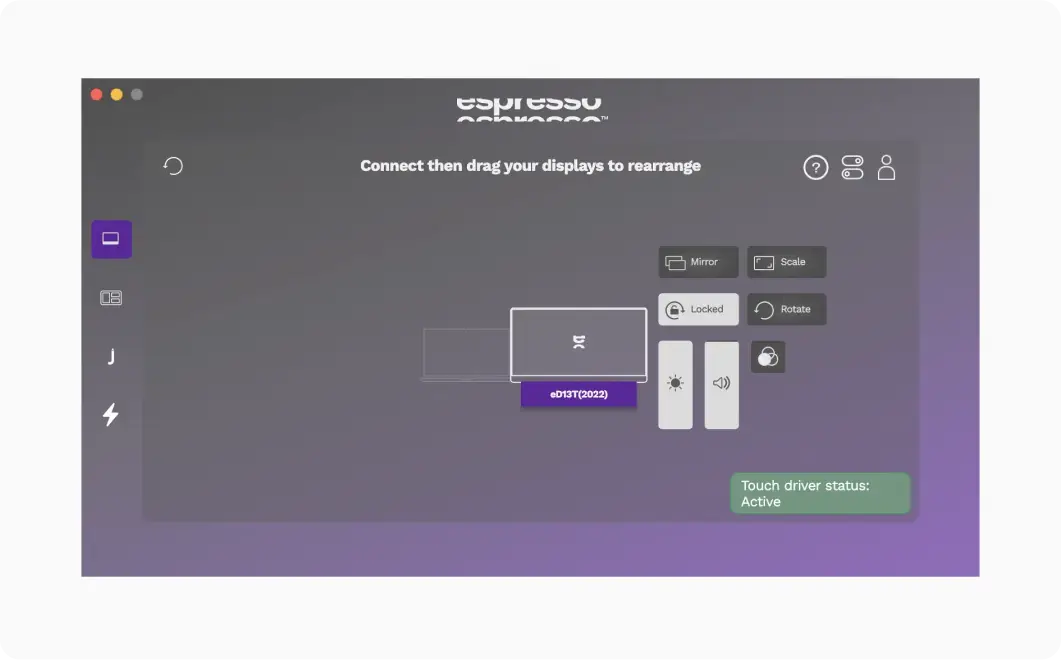
Step 3a.7. After installing espressoFlow, you should see this as your home base. Click the espresso graphic to open its settings. Now you can see all of these settings conveniently in one place.
You'll also notice the green bubble in the bottom right corner. This is a quick check to see if your touch driver is working correctly. If you ever have issues where the touchscreen isn't working, please open espressoFlow and check to see that it is green and active.
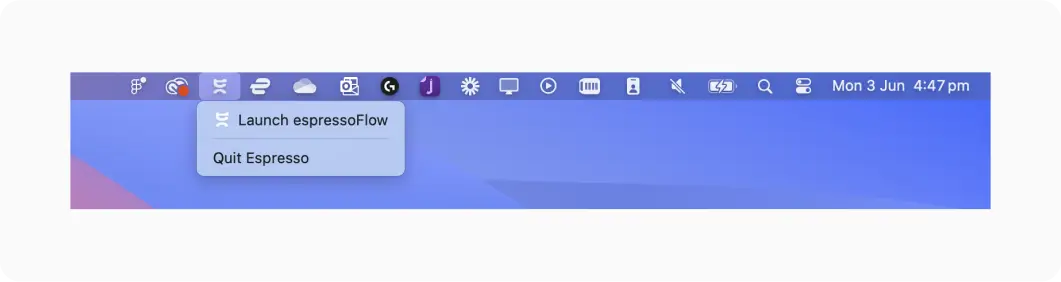
💡Tip: You can access espressoFlow in the top bar, near your Date & Time.
Step 3a.8. To adjust the touchscreen functionality, click the settings bar in the top right. It should look like the image below:
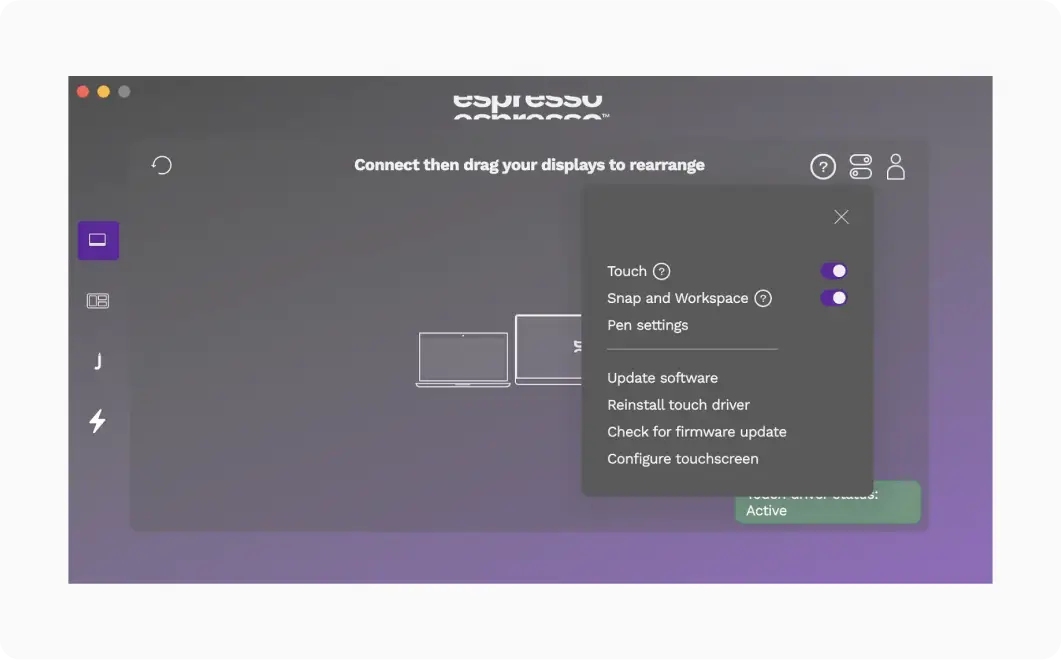
Here you can make the following adjustments:
- Touch - this refers to finger touch, you can turn this on and off so that the Display only receives input from the pen. This avoids any accidental drawing from your palm or fingers.
- Pen settings - you can adjust the buttons of the stylus to either Right Click, or to the Jot Launch Menu which is what we recommend (once you install Jot later on).
- It also has the settings for updating software, checking for updates, reinstalling if there's an issue or configuring your touchscreen.
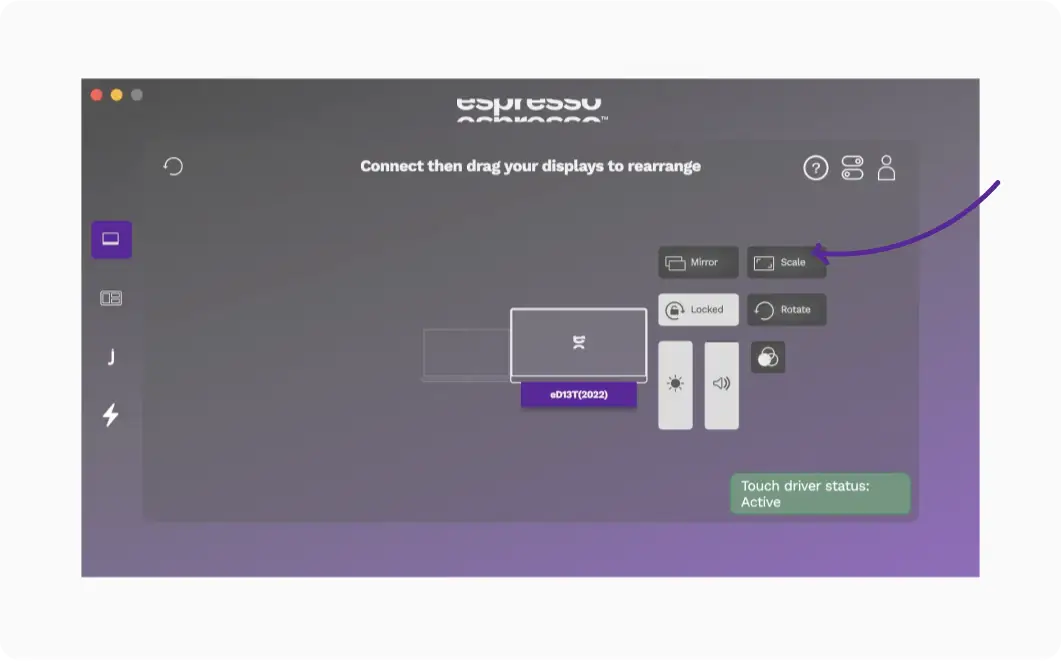
💡Tip: If you have an espresso 17 Pro, it might be worth changing the scale of your espresso if buttons and text look too small or big. You can do this from the Scale button.
That is the overview of adjusting the settings. Spend a few minutes trying each one so you know what to expect and know what to adjust later on.
If you have any issues or questions about this step, please get in touch with our support team at the bottom of the page.
Otherwise, please skip to step 4 if you have successfully completed 3a.
3b. Adjusting settings for Windows
Native Settings
Step 3b.1. To access native settings on Windows, click on the Start menu -> Settings -> System -> Display
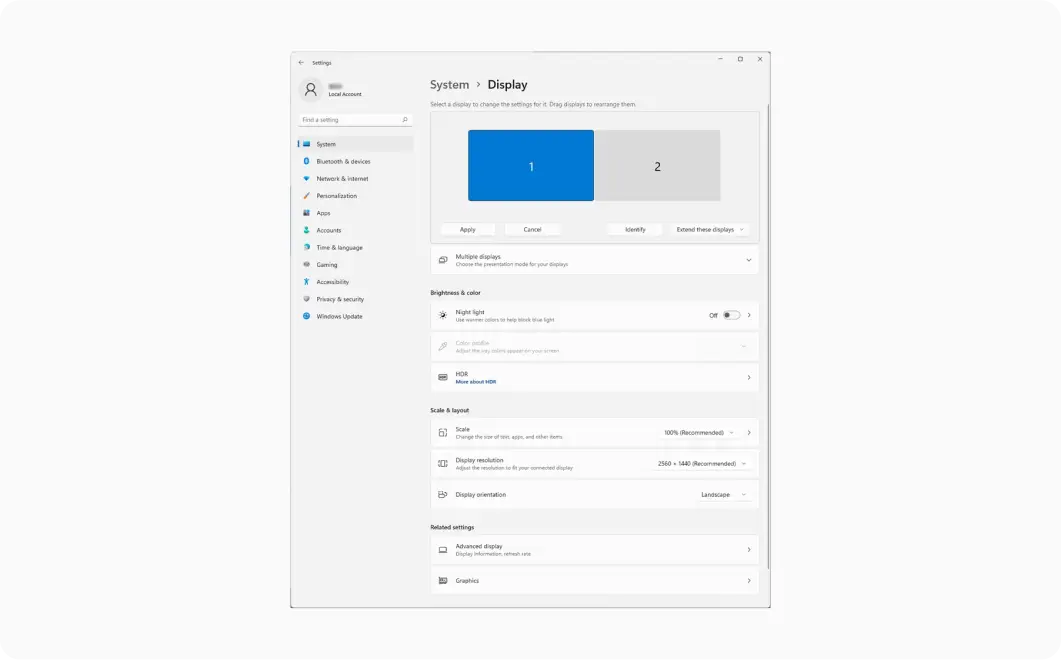
Step 3b.2. To change your screen resolution, use the drop-down menu next to Display resolution.
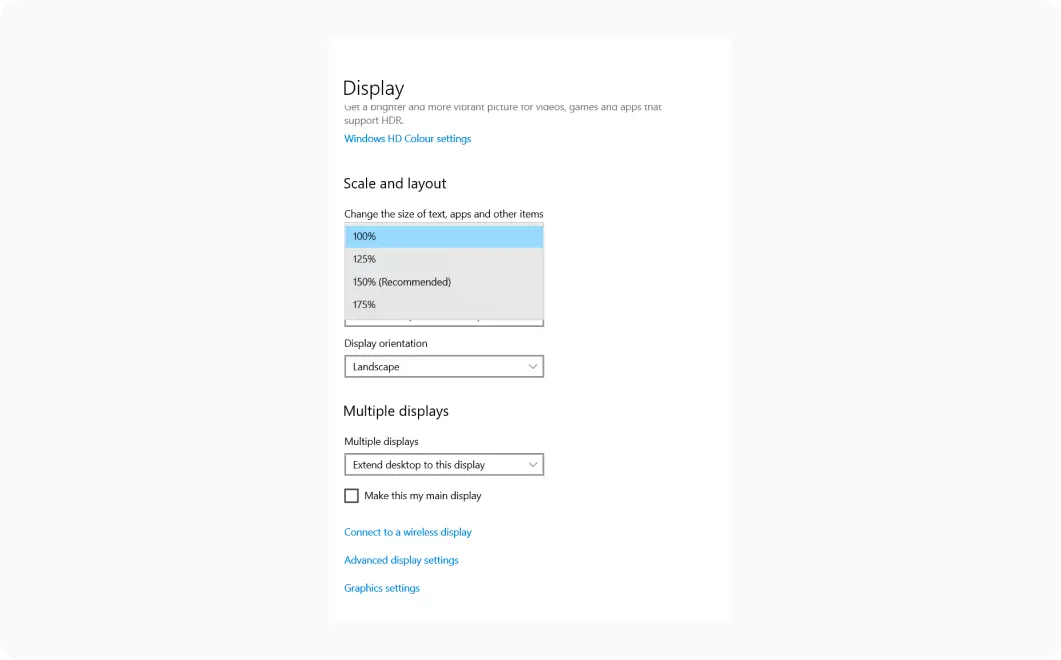
💡Tip: If buttons and text look too small or large, you can adjust the scale to suit your preferences.
espressoFlow for Windows
We have built espressoFlow to show all your settings in the one place and also enable the Auto-Rotation feature. We find many Windows customers find our settings menu much easier to adjust than the native windows one.
Click here to download espressoFlow for Windows 10 & Windows 11
If you have any issues or questions about this step, please get in touch with our support team at the bottom of the page.
Otherwise, please continue to Step 4.
Step 4: Utilising the touchscreen functionality
We believe that interactivity in our daily workflows is going to increase the more that AR, VR and other forms of spatial computing enter into our workflows. Our touch technology is a step in that direction that is useful for everyday workflows today.
Here are a few ways you can utilise the touchscreen in your workflow:
- During a Zoom call, when you're trying to explain a concept that is difficult with words alone - open up a digital whiteboard and share screen to explain a concept with a visual aid
- Marking up a presentation or document, or giving feedback to someone in a remote setting
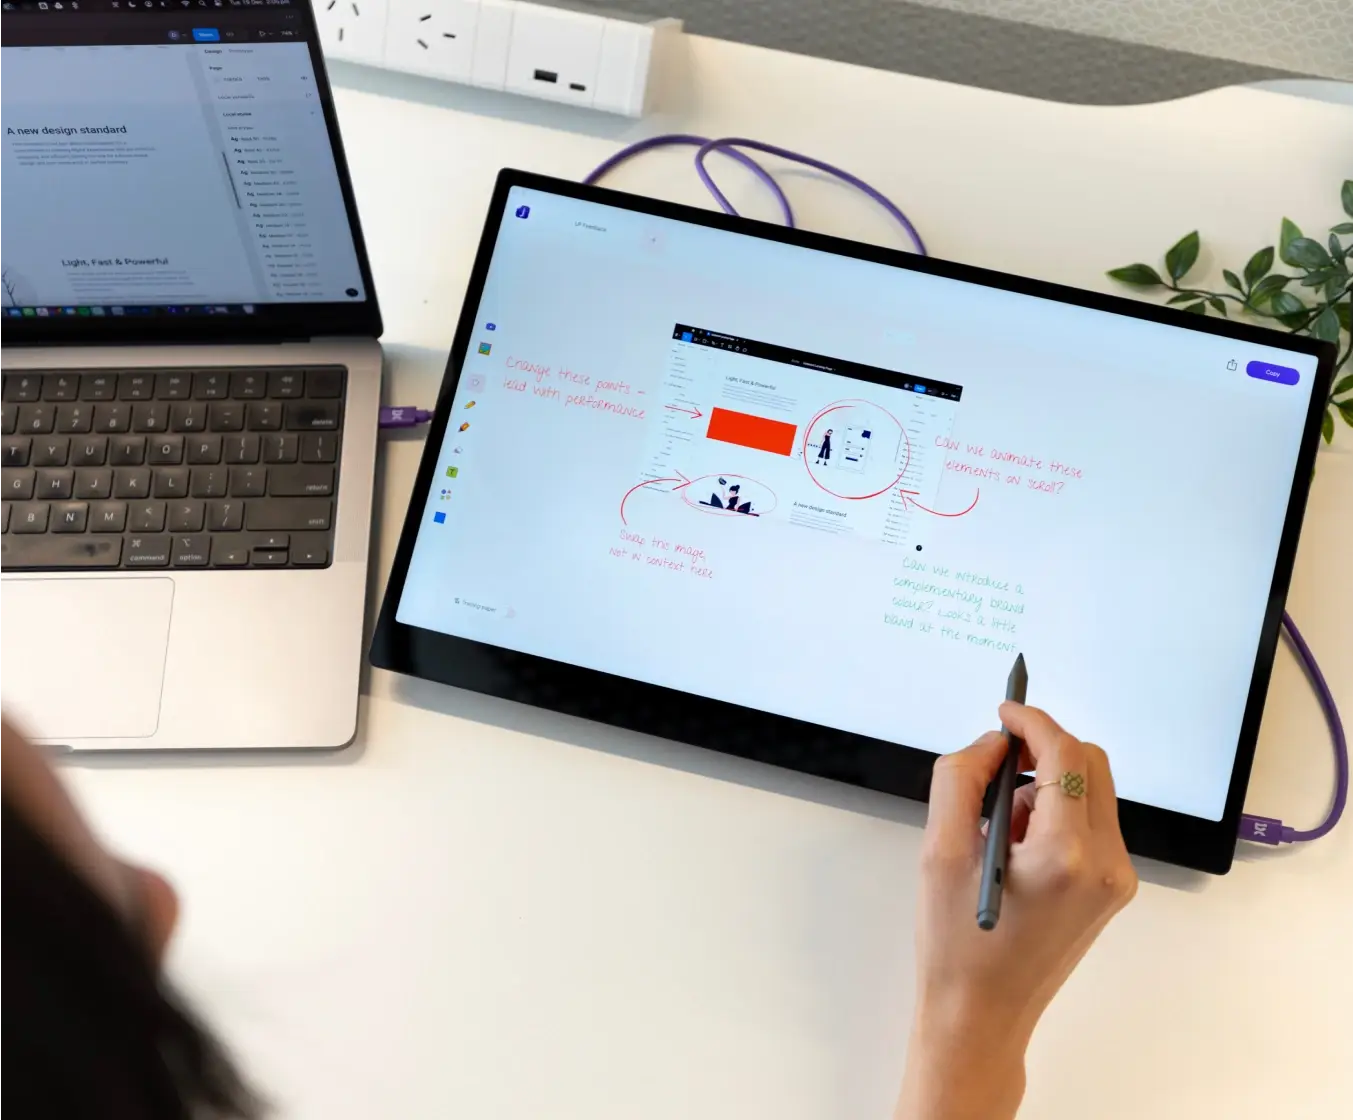
- Writing down notes, or doing an illustration in a digital workshop
- If you use specific software tools (i.e. music production), use the toggles with your finger for a more intuitive way of adjusting

For a long time, we recommended our customer base to 3rd party apps but the experience was never as good as we wanted it to be. So we decided to make our own software called Jot. It is a digital whiteboard designed for the espresso Display & the Pen. Try it out!
You can download here:
This is the fastest way to draw something down, and send in a communications channel or email. This tutorial below is the best way to learn about how to use Jot.
If you have any issues or questions about this step, please get in touch with our support team at the bottom of the page.
All done! Please take a moment to help us improve this setup process.
Contact Support - VIP Support Line
Please email support@espres.so with subject line "Onboarding Issue - [Insert Qurery]"
Thank you once again for choosing our products, we hope they help you work better and easier!
- Team espresso


.png)

